Tuesday, 27 December 2011

Editing - Adjusting the Speed

The use of slow motion is vital to our music video, as we feel that including it will boost the professional feel of the piece.
Altering the speed of a clip is easy, however, getting the speed correct to fit the overall feel of the music video is difficult.
In the image above shows the window that opens after clicking the 'Modify Speed' option. The speed can be altered in two ways:

  1. The duration of the clip can be typed into the box, and the speed is changed accordingly.
  2. The percent can be changed; anything below 100% slows down the clip, and anything above 100% speeds the clip up.
There are several clips in our music video that have been slowed down, and we think they are effective as they reflect the change in pace of the song.

Sunday, 25 December 2011

Editing - Using LiveType

To finish adding the song title and artist to our music video, we needed to use LiveType.
After placing the file into LiveType, we then had to adjust the settings. The images below show the timeline, as well as the options available for changing the size and other attributes of the image.
After making sure the text was the right size, we exported the clip into a QuickTime Movie, which allowed us to place it into Final Cut Express.
Once there, we used the pen tool to fade it in and out, which gave this part of our video a professional feel.

Saturday, 24 December 2011

Editing - Using Photoshop

A part of the music video, the title and artist must be placed at the beginning and at the end, much like the video shown on music channels. To do this, we decided to use Adobe Photoshop for the first part of the process.
After opening Photoshop, the first thing I did was create a new file. I decided to make this transparent, which meant that when eventually put into Final Cut Express, only the text would be visible.
Using the text tool, I selected an area and typed in the information needed. I changed the font and the size, as well as the colour of the text. Below is an image of the layers used in Photoshop.
The layer filled with black was eventually deleted, as it was only there so I could see how the white text looked. The image below show how the text looked.
We saved this image as a .png file, meaning that we were able to have transparent areas. We then imported this file into LiveType.

Thursday, 22 December 2011

Editing - Creating a 'Dream-like' Feel

To develop the editing of the montage section further, we have decided we will try to create a 'dream-like' feel. The way to do this would be to use the 'Vignette' effect available in Final Cut Express.
The above image is of the tab opened when the 'Vignette' effect is applied. The options can be adjusted to suit each individual clip; each clip had different values used, yet the overall effect remained consistent.
The size of the vignette we used was large enough to be noticeable, yet not too big to be distracting. We feel as though this worked well for our particular video.
The falloff option changed would feathered the vignette was. Less falloff meant a harder edge to the vignette. We opted for a softer option, as we wanted the effect to be subtle and not overpowering.
The blur amount changed how much the vignetted area was blurred. We kept this as low as possible as any value higher would have looked unproffessional.
The darken option changed how dark the vignette was, and we lowered this value to make our clips seem happier and more uplifting.
The saturation option allowed us to desaturate the vignetted area, which we utilised as we wanted to further accentuate the colours of the non-vignetted area.
The mix option changed how much the vignette mixed with the clip, and we kept this value the same.
When placed alongside the colour changing, we feel as though the effect created by the vignetting was successful and of a high standard. Below are a two examples of the finished editing.

Editing - Altering the Colour

As mentioned before, the montage section needs to be edited in a way that differs from the rest of the music video. In previous posts, I have attempted to create an aged effect on the video, although this has been unsuccessful in my opinion. Therefore, I will try to use a simpler technique that I am more comfortable in using to try and gain a better end product.
Altering the colours of the video will enable me to signify a clear difference between the montage section and the other areas of the video. As shown below, there are several steps to changing the colours and overall effect of the video clip, which I will briefly describe.

  1. Firstly, you must select the clip you want to alter, and then apply the effect. This opens the tab shown above; I used the 'Color Corrector' effect, but there are also other effects available to use.
  2. If you want to adjust the tint of the clip, the two wheels are needed. The left wheel changes the balance of the clip, so if the cursor is moved to a yellow area, a yellow overlay is placed upon the clip. The density changes according to how far away from the centre the cursor is moved.
  3. The right wheel changes the hue of the clip. When the cursor is moved, all the colours of the clip change in unison; a green tree and be turned to red using this tool, for example.
  4. The top three toggles shown are all linked to one another in the sense that they affect the brightness and contrast of the clip. To add more contrast, move the 'Blacks' cursor left and the 'Whites' right. The 'Mids' toggle alters the mid tones of the clip, and this is mainly used when the desired effect cannot be achieved through using the 'Blacks' and 'Whites' toggles.
  5. The 'Sat' toggle represents the saturation of the clip - or how much colour there is. Moving the cursor left with remove colour, making the clip closer to monochrome, whilst moving it right will accentuate the colours, making the bolder and brighter.
For our montage section, we decided to increase the contrast and saturation, with the extent of which changing depending on the clip. The use of the two wheels helped us to highlight the colours of the clips, and to focus on the colour with the largest coverage. For example, a shot of us on grass would be given a green/yellow tint, with the hue moved slightly to a more yellow colour. This would not make the final effect seem ridiculous and the colours would still be realistic, but just more vivid and dream-like.

Wednesday, 21 December 2011

Editing - Trimming of Clips

This year, we have had to improve our editing skills in Final Cut Express and the quality of work needs to be higher than at AS Level. Therefore, we have looked at some of the problems we encountered last year, and aim to rectify them for this project.
One problem was our clips. In Final Cut Express, when you upload your footage, a clip is created. Last year, we uploaded each take separately, cutting off parts of the footage that we deemed surplus to requirements. As a consequence, if we needed the clip to be four seconds in length, yet only had three seconds, we couldn't extend the clip.
This year, we have decided to upload all our footage from the same filming session as one long clip, and then cut them into smaller clips, which we will then drag into the clips folder. Below is an image showing numerous clips we have created from one large one.
Advantages of Using This Method

  • We are able to extend the clip to the length of the entire piece of footage we captured.
  • We become familiar with our clips when cutting the long clip, making it easier to select which clips to use.
  • The strongest pieces of footage were selected, with weak shots not included in our clips folder. They are not lost, however, as we can just extend the shortened clip.
  • We can see whether the footage translates well on screen, and whether we will have to re-shoot parts/whether we have enough footage.
Disadvantages of Using This Method

  • It is time consuming, although this isn't necessarily a problem for our group as we are on schedule to finish in time for our deadline.
  • We cannot name each clip like we did in the previous year, although we are more familiar with the clips as we have to cut them.

Tuesday, 20 December 2011

Filming - Capturing Different Angles

To make our music video of a professional standard, we must not use 'boring' shots as these will not maintain the audience's attention. After looking at over one hundred music videos throughout the duration of the project, it is evident that the most striking and interesting videos were those that used a variety of different shots and used many different angles.
Today over the park, we tried to do this as we discovered that we were short of footage that were of Sarah's face; we will be using shots of the face to display emotion, as it is the most emotive part of the body. Moreover, we also hoped that the filming session would help invigorate some more creative ideas and help shape the remainder of the project.
On several occasions, we filmed in the same shot numerous times, each time altering the framing, the distance between the camera and subject, the focus and the vantage point. This allowed us to create a decent amount of footage in a short space of time, and gave us a lot of options for the editing part of the process.
Below is an image of us altering the length of the legs of the tripod, so we can film from a different angle.

Editing - Emphasising the Lip Syncing During the Video

Part of the coursework's requirements involve the inclusion of lip-syncing within our music video. To make our lip-syncing obvious to the examiner, we have decided to feature lip-syncing for a solid thirty seconds; the length of the chorus.
In order to keep this section interesting, we opted to the use four different shots, one for each line of the chorus. Below are gif images of the four shots we used.


The shots used are all relatively close to the character, meaning that the movement of her lips are clear and obvious. We feel that this section will be effective as the emotion of the character is portrayed strongly, meaning that the audience will develop an attachment to the character and feel sympathetic towards her.

Friday, 16 December 2011

Filming - London Session

After planning our day in London, we feel as though we had a successful day, and got a good amount of footage that will hopefully feature in our music video.
After meeting at Dagenham East station, we travelled to Temple to begin filming in the area we had arranged to film. Unfortunately, the gate for the area did not open until 12 o'clock, meaning we would have to wait for around an hour before we could enter. As I had visited this part of London a few weeks prior, I knew there was a nice location nearby. We decided to film there to past the time. Below is an image of the location.
After filming in this location, we went back to the first one and discovered that the gate was open. Whilst setting up the tripod and camera, we were approached by someone who told us that we needed a licence to film there. After leaving, we moved went back to the train station and travelled to Oxford Circus station. We headed to Hanover Square but found that is was different to the place I had visited. We then wandered around, trying to find the right place, but settled on a grassy area near Oxford Street. Here, we filmed several close-up shots and altered the focus on many of these. We hope to use them as they looked to be of the same style as the rest of our footage.
After filming there, we moved back to Oxford Street and filmed the lip-syncing section. Sarah had the sped-up version of the song and sang along with it whilst we filmed here. We used different angles and types of shot as we want as many options as possible when editing. Below is an image I took of Ashleigh filming.
After filming this section, we walked just around the corner and onto a raised area in the middle of the road. Here we filmed Sarah walking towards the camera, and a shot the pans around her several times.
Above is an image of where we filmed, taken from GoogleMaps. During our visit, the roadworks were complete.

Thursday, 15 December 2011

Filming - Preparation for London Session

Tomorrow, we are heading to London to film the opening section of our music video. After this filming session, we will film once more on Thursday, which will hopefully mean our filming is complete; we may have to reshoot small sections, but we are confident we captured enough footage to cover any mistakes we made.
To make efficient use of the small amount of time we have available, we have decided to plan a route we will use, as well as the locations we will film at. Below is an image of the notes we made.
Route
As we are meeting at Dagenham East, this will be our starting point. We will then travel to Temple, where we'll take a short walk to an area I found whilst on a photography trip. Below are three images I took on the photography trip, all of which show the area, and possibly the shots we will recreate.


After filming here, we will then return to Temple and travel to Monument, from which we will walk to Bank. From here, we will travel to Oxford Circus where we will film along both Oxford Street and Hanover Square. I have visited Hanover Square before, and hope to use the fountain area there in our music video.
Types of Shot We Hope to Use
As with the footage we have already captured, we hope to use a range of varying shots, including a long shot, extreme close up, and a pan shot. Additionally, we hope to use a large amount of differing angles to try and create different effects.
We also want to experiment with taking a long shot and shortening this using Final Cut Express. To do this, we would have to capture a piece of footage that's twice the length we want the final shot. We would then double the speed of this clip.
We also want to experiment with slow motion, and will therefore try to capture a lot of movement in our footage. Additionally, we have increased the speed of our mp3, meaning that Sarah would easily be allowed to sing along to the music. We will then slow down this footage to make the lip-synching the correct speed. We hope this will look effective. An example of this is shown in the clip below.

Wednesday, 14 December 2011

Editing - Lip Syncing

Editing the lip-syncing is probably the hardest part of the process, as it needs to be perfect.
After uploading the footage from our tape, we had to place each clip onto the timeline, with each clip in a new layer. As we capturing each attempt of lip-syncing as a whole take, the process was much easier.
We'd estimate where the lip-syncing started, and try to place it in the correct part of the timeline. We would have to watch the attempt on screen, before deciding whether the lip-syncing was before or after the lyrics of the song, with us moving the clip accordingly.
Even though the process is tedious, each clip only took a few minutes. We would then lock the layer, and check/uncheck the visibility of it according to whether we needed to view it.
This method allowed us to cut sections of the take out and move them to different layers, meaning that we could insert the footage at the right time, but still on a separate layer.

Sunday, 11 December 2011

Editing: Potential Problems

As the graveyard and montage sections of our music video differ from the main body of our work in terms of mise-en-scene, it is therefore difficult to predict whether or not these pieces of footage will work and create the desired effect.
The Graveyeard Section
With this section, it will most likely be a continous journey to the gravestone, possibly with some lip-syncing added in between. As no shots of this location are planned to be added in the earlier part of the video, there is a possibility that this will create a lack of fluidity within the piece, which is obviously detrimental. A way to solve this would be to place clips from the location into earlier parts of the video; however, this section was designed as a different chapter with the text, rather than an integrated part that is shown throughout the piece as a whole.
A further solution to the problem, providing it occurs, would be to make this mistake seem deliberate. By emphasizing the problem to a large extent, the mistake becomes an artistic statement rather than remaining an error. A way of doing this would be to completely desaturate the section, and use a lot of contrast, which would create a dramatic, morose feel. However, we feel that this may be slightly tacky and unprofessional.
The Montage Section
We also have a similar problem with this section, although we want to show a clear difference between this part and the rest of the music video. Moreover, it is vital that the audience comprehend the meaning behind the inclusion of this section; it is a collection of memories and must be recognised as that. In order to find the correct effects, I have decided to look at other texts to understand the methods they used when showing a character's past.
The television show That's So Raven repeatedly differs from showing the present to the future, and has to be clear is highlighting the difference. In the video above, it is evident that blurring has been added to the footage, as well as an increase in brightness, contrast and saturation. Additionally, a 'hazy' effect has been added. This adjustments are inspiring for us, and gives us ideas for our own project.

Saturday, 10 December 2011

Editing - The Graveyard Section

As mentioned before, this section will be shown as a journey, with the shots placed in chronological order, appearing more like a story than the previous parts.
As the section was planned in this way, we decided to use a variety of different shots when filming, thus making the final outcome more interesting and engaging. The walking part, for example, was inspired by Rihanna's What's My Name video, and the shot and cuts used are similar to the video.

The two images above show the contrast in shots we used, which we hope will create an interesting outcome.
The image below shows the editing timeline, and how we placed a piece of lip-syncing in between section to break it up slightly and maintain the audience's attention.

Thursday, 8 December 2011

Editing - Use of Fast Paced Editing

Even though our song is slow lyrically, we have decided to use some quick editing at the beginning of the song. This is due to the fast strumming of the guitar in the song. We feel that the fast paced editing will represent several things:

  • In the analysis of the lyrics, it was clear there was some sort of traumatic events that had occurred. As these events usually happen quickly and chaotic, we though a faster pace at the beginning of the video would reflect that, whilst a slower pace would better portray the realisation and coming to terms with the past that is shown in the song.
  • At the beginning of most music videos, especially ones which contain some form of a narrative, have to set the scene for the remainder of the video. Therefore, a quick pace will allow us to use more shots which will in turn enable us to display the locations, moods and emotions we want to put across to our audience.
  • The beginning of the music video has to be intriguing and engaging for the audience in order for them to continue watching. We decided that the use of fast paced editing with be the most effective option.

Above in an image showing the quick cuts used at the beginning of our music video.

Saturday, 3 December 2011

Planning: Storyboard - Second Attempt

As we had a large change of plans regarding the location, we decided to create a second storyboard. This will allow us to efficiently film our music video, and also gain inspiration when visiting our locations; we will always have a reference point in terms of framing and mise-en-scene. Below is the storyboard.

Friday, 2 December 2011

Planning - New Locations

After deciding that we were not able to film at the desired location - Walton-on-the-Naze - we needed to think of a suitable areas we could film instead. We came up with several locations which were local, cheap/free to get to and aesthetically pleasing.
Eastbrook End Crop Field
In Eastbrook End, a short journey away, there is a crop field that we noticed we filming the montage section of our video. We feel that this place is ideal for us to film as the movement of the crop field will be interesting and the location mirrors that of professional music videos. Below is an image I took at this location.
Secluded Area
Whilst on a photography trip, I discovered a secluded area, roughly ten minutes from the crop field. This location is perfect for our music video, and we will definitely be using it. Below is an image of the location that I took.
We are confident that these locations will look good on camera and will make our music video look of a professional standard.

Planning - Problems with Location

As mentioned in a previous post, we were unsure of whether or not we were able to travel to Walton-on-the-Naze to film at the beach, like we had planned. Today, we decided that we would not film at the beach. We decided this for several reasons:

  • Ashleigh works, meaning we have to work the filming schedule around her commitments; we can only film on one day during the weekend, unless we travel without her.
  • It is nearing winter, meaning that a sunny day is becoming more elusive, which limits the days we can travel further.
  • The days are shortening, meaning we would not be able to film from roughly 3 o'clock onwards, which in a hindrance.
  • It is expensive to travel there, and we do not want to potentially waste our money as we may have to refilm the sections.
  • There are numerous locations that we can use that are local and are free to travel to.
  • We were intending to travel to London, which only costs £3, to film so we can adjust our filming plans.

Friday, 25 November 2011

Editing: Technique: Kings of Leon - Sex on Fire

As our song has a rather slow pace and we intend to use a fast style of editing, we feel it is beneficial to look at a music video that mirrors the idea we will be trying to execute. The video we are going to look at is Kings of Leon's 'Sex is on Fire'.
One thing that makes the fast editing work is the continuation of the mis-en-scene. Whilst the shots do differ in location, the overall feel and theme remains constant. This is something we will have to try and replicate in our own work. The effect of this is a fluidity in the music video and helps make the fast editing fit the theme of the video.
Furthermore, the editing is placed on the beat of the song, which doesn't make it seem out of place. As our song also has a strong beat, we will attempt to place the cuts on the beat to make it seem professional.

Sunday, 20 November 2011

Planning: Costume, Hair and Make-up - Choices and Symbolism

In order for us to make the most effective music video possible, we must plan certain aspects of the mise-en-scene in advance, and also include some meaning behind them.
Costumes
For the costumes, we have opted for Sarah to wear a series of dresses, as they will enhance her femininity and allow our target audience to better relate to her. Thus far, we have two ideas we could potentially include. This first is a floral dress, preferably of a blue or purple colour.This will allow the actress to stand out from the remainder of the frame and become the sole focus of the shot. Additionally, the flowers on the dress we suggest a delicacy and fragility in our actress, which is one aspect of the character Sarah will be playing. An image of this style of dress is shown below.
The next idea was for Sarah to wear a white lace dress. We thought this would be appropriate as white lace suggests purity, innocence and new beginnings. We feel this would match our interpretation of the song and will thus look to include it. Below is an image of the style of dress we are hoping to include.
In terms of our male character's attire, we feel that including a t-shirt with a skull or skeletal design, which would infer death, may be effective. Below is an image of the type of t-shirt we could potentially use.
Hair
As our video will be film in open spaces, we feel that it would be best to have Sarah's hair down, and either wavy or straight. This would mean that the hair would move with the wind, and mirror the emotional scenes from films such as Pocahontas. Below is a gif showing what we will try to replicate.
Make-up
As we do not want to detract attention away from the emotion portrayed by our actress, we will probably use a more natural style of make-up, as shown in the image below. From the picture, it is clear that her facial expression are not overshadowed by her make-up and that her eyes, the most expressive part of the face, are emphasized by the use of moderately applied mascara and eye-liner.

Research - Product Placement

Product placement in evident in many texts, and is used as a way of marketing products. The definition of product placement is:
A practice in which manufacturers of goods or providers of a service gain exposure for their products by paying for them to be featured in movies and television programs.
Many music videos feature product placements, some more heavily than others, and may be something we could include if we wanted to. Below are just a few examples from many of the products featured in Lady Gaga's Telephone video. The products shown include Diet Coke, the dating website Plenty of Fish and Virgin Mobile.
While product placement is generally accepted, the amount included in Gaga's work was controversial. Therefore, we decided that we would not feature product placement in our work, as we feel it would detract from the meaning of the song and video.

Friday, 18 November 2011

Planning: Filming Schedule

Over the next few weeks, we are aiming to complete all of our filming, thus allowing us to have a considerable time to edit our video. To do this, we have created a filming schedule that takes into account our commitments outside of school and tries to include us all in the project.
From the table above, it is clear that the filming should take no longer than four weeks, which is reasonable. This may be shortened, as we could also film on more weekends to quicken the process. We may also include more filming sessions during our media lessons, just to re-film anything we feel is not of the quality it should be.
The schedule includes any props/items we will have to take with us, which is mainly a change of clothes and the necklace. We have made a note of what we need to film, but this could be changed depending on the weather and the amount of time we are able to film. Locations are included, as well as when we would upload the footage onto the iMac.
Overall, we feel as though this table we be beneficial to our project and allow us to work quickly and efficiently.

Thursday, 17 November 2011

Research: Past Student's Work - 'Rough Cut' by Amber Rubarth

To gain further inspiration regarding our music, as well as looking at the standard of music video we will try to achieve, we have decided to look at a past student's work. Last year, a group of students from our school used the song 'Rough Cut' by Amber Rubarth - our back up song. Therefore, we feel it is beneficial for us to analyse this music video.
Strengths
  • The narrative of the music video was strong, and supported the meaning of the lyrics whilst also being unique.
  • The fades to black and dissolves were effective and added extra impact to the previous shots.
  • The use of the reversal feature from Final Cut Express is used effectively.

Weaknesses
  • The opening shot was not as powerful as I had expected. Having heard the song before, I know that the lyrics have emotional meaning, thus leading me to anticipate a strong, haunting opening.
  • The horizon during some of the lip syncing was not straight, and was therefore off-putting.
  • I thought there should be more lip syncing using an extreme close-up, so emphasise both the editing of the lip syncing and the emotion portrayed by the actress.

Overall
As a whole, the piece was enjoyable and to a relatively high standard. Moreover, I thought the editing was effective, and helped make the music video as strong as it was. However, some of the acting was not to the same standard as the rest of the piece, and a few of the shots used were not appealing to the viewer, as they were shaky and off-putting.
From looking at this music video, it is evident that having a strong and interesting narrative will help us create a good product. Moreover, we must pay particular attention to the types of shot we use (whether they corroborate with the timing and lyrics) and the quality of shot, as we want our music video to look as professional as possible.

Tuesday, 15 November 2011

Editing - Uploading and Editing the Montage Section

After filming the montage section, we uploaded the footage and began to note down which pieces we think will work well together.
From the image above, it is evident that we now have a large amount of footage for a small section of our music video. This is an advantage for us, as it means we have a lot of footage to select from, which will allow us to pick the best shots. Below is an image showing some of the footage we have.

Monday, 14 November 2011

Filming - Montage Section

Over the past few days, we have filmed a lot of footage for our montage section. We hope to have completed this section of our project, as we would like to move on and film the other sections.
As the montage is meant to be a collection of memories over a long period of time, we were thankful for the constantly changing weather. Additionally, we changed our clothes numerous times, and visiting many locations to give the impression that these were memories.

Sunday, 13 November 2011

Editing: Using Photoshop - Pros and Cons

Recently, I mentioned briefly that I may try to use Photoshop in order to obtain a more visual appealing music video. Before I commit to this approach, I decided to test this out on a small piece of footage and draw up a list of pros and cons.
Pros
As I am a photography student, I am able to use the software's many functions to a decent standard. This means that the editing process, regarding colour, contrast and effects rather than cuts, will be more flexible, and the results would, in theory, be of a higher quality.
When attempting to edit the video clip in Photoshop, I managed to take a screen grab which we may use for our digipak. Below is said image.

Cons
After I exported the clip and put it into Photoshop, I discovered that the video had become slightly pixelated. This would only increase once I export it again to get it back into Final Cut Express. The quality will worsen once again once we export the music video as a whole.
Using this method is very time consuming, and we may not have enough to edit all the clips we want to in this way.

Friday, 11 November 2011

Editing - Beginning to Upload and Edit

After recently filming some footage, we have decided to upload it into Final Cut Express and see how effective the shots are when placed alongside our chosen song. Below is an image showing the clips in the editing software, as well as the music.
By watching the shots as well as listening to the music, I realised that footage had more of an emotional impact on me, the audience, that it had when I viewed the clips alone. This is a good sign, as it means that when we begin to edit the scenes that we are trying to actively display emotion in, the song will amplify the visuals.
Above is an image of two clips we will aim to use in our music video. At present, the footage is not looking as eye-catching and visually appealing as I would have like. One of the reasons for this was because the weather was poor when we decided to film this section. As a consequence, I will have to use Final Cut Express to boost both the colour and contrast to get the desired effect. Additionally, I will try to export a similar clip into Photoshop and see if the quality changes; I am more competent with Photoshop's function than I am with Final Cut Express, meaning that the outcome will be most likely be better.
Overall, I am pleased with this footage, and am positive they will be successful once edited.

Thursday, 10 November 2011

Research - Expanding and Increasing Sales and Audiences

The music video serves several purposes; these include both increasing sales for the artist, and broadening their audience. Therefore, we feel as though it is beneficial to our project to see some examples of this, as well as looking at the possibilities are project could create for Allie Moss if our music video was used officially.
Example
Rihanna is an artist who constantly interests new audiences, as well as keeping her loyal, dedicated fan base happy. She does this by reinventing her appearance, and consequently tweaking her style of music to suit this change. Below is an image showing the change in appearance between her six studio albums.
From the above image, it is evident that Rihanna has utilised the current fashion trends to extend her audience to more and more people.Moreover, her styling also helps her to connect to people of all ages; some of her album covers are light hearted and fun and therefore for younger people, whilst others are either sexualised or emotive, which would be target at a slightly older audience. From this piece of research, I can understand that image is important to the audience an artist wants to target. Additionally, increased sales come from having a wider audience, particularly if a more populated group of people are targeted effectively, such as teenage girls.
Linking Findings Back To My Own Work
As Allie Moss' appearance has an indie vibe to it, her target audience would most likely be young adults; moreover, as she herself is female, other females would be able to relate to her. Thus, we will have to target this demographic. However, we do not feel as though we should be limited to Moss' current fan base and seek to extend it. To do this, we will have to select a group of people to try and attract. The most likely option will be young, male adults. To attract them, we would need to use the stereotypes usually associated with young males and the media they consume. Accommodating this factor would mean the use of an attractive female, which we feel we are using, as well as a relatable male character, which we are again using. This will hopefully enable us to extend Moss' fan base and consequently increase her sales.
The attractive and relatable female character.

The male character who is also relatable to both male and female audiences.

Wednesday, 9 November 2011

Research - Analysis of Survey Results

In order to gain the most from my survey, I have decided to analyse my results. This will enable me to gain a greater idea as to what my target audience is, and what they are expecting in terms of a music video for particular genres of music.
Question One: What is your gender?
Luckily, the male to female ratio is nearly equal, meaning that the responses gained will not be favoured to one particular gender to a noticeable extent. However, this may prove detrimental to our efforts as we intended to aim our music video at females, thus meaning that it may have been beneficial to have more females complete the survey than males.
Question Two: How old are you?
As we were intending to target a teenage audience, we were glad that half of our responses were from people aged between 16 and 20 years. Moreover, the four categories with the least number of participant were those above the age of 21, meaning that our response are largely from a younger audience. This will better inform us when we make our music video.
Question Three: What is your favourite genre of music?
As the answer to this question involved the participant typing their answer into a text box, I have decided to use Wordle to display the results. As expected, the most popular answer was 'pop', with 'acoustic' being second. This is great news for us as the genre of Allie Moss' music is 'acoustic', and is therefore a marketable genre. This would make it more probable that our music video would be popular as more people would want to listen to the song in the first place. Additionally, there is a lot of crossover between the 'indie', 'rock' and 'acoustic' genres meaning that more people would be inclined to listen to this type of music and consequently watch the music video.
Question Four: What is your favourite genre of music video?
This question was designed in order for us to narrow down our choices of video. The most favoured choices were 'Narrative' and 'Artistic', which will therefore be something we will try to include in the creation of our own music video. Both the 'Comical' and 'Animated' categories were the least selected, alongside a 'Dance' based music video. We will not be looking to include these elements as a consequence. The two 'Other' responses were "Urban" and "One showing a gig or concert". As neither option would suit our song particularly well, we have decided not to pursue these two options.
Question Five: What aspects of a music video do you enjoy the most?
The most selected category for this question was 'Interpretation', which therefore underlines the importance that we provide an accurate and relevant interpretation of the song through our video. 'Costumes, Hair and Make-up' was also a popular choice, which means that we will have to pay attention to this when selecting outfits and preparing for shooting. 'The Artist' was a popular choice, yet we are unable to fulfil this due to us not knowing Moss on a personal level. Additionally, 'Settings' was not selected once by our participants. We feel that this may be because the locations are never the focal point of a music video. However, we feel that they are vital to the portrayal of a particular message and including locations that are congruous to our theme is pivotal in creating a successful and professional standard music video.
Question Six: How many times would you view a music video you liked in a week?
The majority of participants would view a video they enjoyed between three and five times a week. This means that the music video must be able to maintain a high level of interest throughout the many times people would watch it. To do this, we would need to create moments which are memorable, and some that are possibly difficult to comprehend fully in the first viewing. Many films, such as 'The Sixth Sense' need several viewings for the plot and all the small details to be understood in their entirety, which is obviously beneficial for the company who made the film. We will try to include this element in our own work as it means that people will watch it several times without losing interest and gain more recognition for the artist and song.
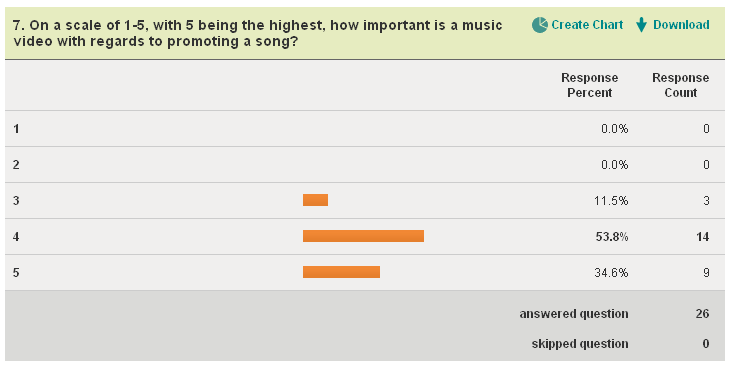
Question Seven: On a scale of 1-5, with 5 being the highest, how important is a music video with regards to promoting a song?
These results were as expected, with participants select either '3', '4' or '5'. This means that our music video will have to be of a high standard as it is key to the promotion of Moss and her music; a poor music video would lower Moss' reputation, which is obviously something we will try to avoid.
Question Eight: What is your favourite music video?
For this question, we were given a range of music video. Below are five which I feel mirror the kind of video we would like to create.
  • You're Beautiful - James Blunt
    This music video is simple with a stunning landscape. We feel we would be able to create something similar with our song.
  • Your Song - Ellie Goulding
    This video is autumnal and uses several focus changes, something we are able to replicate with the HD cameras.
  • The One That Got Away - Katy Perry
    This video has a narrative and uses the past to explain the present, something which we wanted to include through our montage section.
  • The A Team - Ed Sheeran
    This video has a strong narrative about a controversial issue. The song is also similar to Moss'.
  • We Found Love - Rihanna
    This video uses the conventions of a different genre of music and combines it with a mainstream song. This is a great example of how to successful crossover genres and create something unique.
Question Nine: What makes it your favourite music video?
From the Wordle, it is obvious that the narrative is a big reason why people enjoy music videos. This, alongside the costumes, interpretation and ending are the main things we will focus on when creating our music video.
Question Ten: Would you deliberately go out of your way to watch a music video?
The vast majority of people answered 'Yes', meaning that the video is likely to be watched by people who listen to Moss' music, thus suggesting that we must stay true to the lyrics of the songs and provide a strong interpretation.